Monday, August 27, 2012
Designing the Urban Urchin Necklace
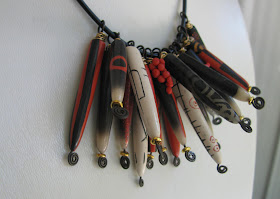
Much as I love the bunched up "urchin" look of the beads posted on the buna cord last week, I'm not sure if I'm ready to present something that avant garde to the buyer. It's trendy, but would have a more limited customer base. This is still different and trendy, but is more traditional and thus more commercial. I think this will be an interesting design to play with, especially in line with the Modular Art Jewelry we worked with last month. The main difference here is that I've placed spacer beads between the Urchin beads so they don't bunch up. This could be designed so the individual beads could be slipped off, the spacer beads removed, and the more dimensional and "bunched up" look could be an alternative.
I'd love to get your input.
Sunday, August 26, 2012
The Mark of the Artist
Urban Urchins: obsession continues:
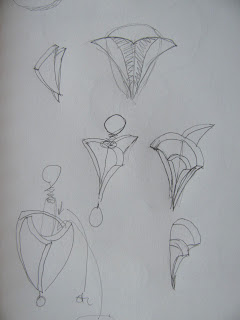
Associated Sketch Book Pages - more stream of consciousness: visual and verbal
The Mark of the Artist:
The following are the views and opinions of this artist. They do not claim to reflect the philosophies of anyone else, past, present, or future, although there may be others of the same ilk.There is a constant struggle between the right brain and the left brain (no politics intended - overtly or covertly!) in artistic endeavors. One overanalyses, oversimplifies and overasserts itself while the other walks merrily into the rabbit hole, oblivious to anything other than the rabbit hole. Feed into that mix the desire of an artist to be accepted, approved of, even championed plus the fact that many of those who play the role of acceptor, approver and champion are unaware that the rabbit hole even exists and you have more cause for creative angst. I'm speaking about perfection vs imperfection in art.
Volumes have been written on this and there is still no consensus on which has more merit, so I'm voicing my personal opinion. I like to see the mark of the artist in any given work of art. Although technical skill of great degree is required to produce perfection, such as photoreal paintings or perfect sculptures, etc., it does not intrique me. It does not draw me in. It does not make me wonder about the artist who created it. It does not get me thinking about possibilities or potentials or reasons or.........in other words, it does not engage me, and to me, art is a collaborative endeavor - the artist creates it and the viewer responds in some way, thus completing the act of creation. Otherwise why ever present a work of art? Why not just put it in a back room to be seen only by its creator?
Because of this I make a point of slapping my wrist when I labour over a piece trying to make it perfect. I have to literally remind myself that I LIKE to see imperfection. I LOVE to see the mark of the artist, whether a piece of hair, a partial fingerprint, an uneven seam or whatever. Stepford wives don't interest me at all, but our culture and our era is obsessed with obliterating our individualism. Many of the younger generation rebel against this and, in adopting some form of societally unacceptable behavior end up spawning a group of neoclones all sporting the same "difference". The flaw in a work of art connects me with the artist who created the piece, and so my question to myself while creating is, "could this be made by a machine that would produce 10,000 just like it?"
I'd love to get your comments.
Friday, August 24, 2012
Urban Urchins - The Creative Process Unfolds
I've been exploring different surface designs and now I have enough to see how they look together.
Close-ups of the individual pieces.
I'll do a total of 50 and see what effect it gives.
Wednesday, August 22, 2012
Studio Tips - Silkscreening
When silkscreening clay, even though the paint dries, it is relatively fragile on the surface of the unbaked clay. If you want to shape the piece into a curve, this trick makes the job easier. Make sure the paint is dry. Then burnish a piece of Clear Deli Wrap or even Saran Wrap onto the surface of the silkscreened piece.
Lift the clay with the plastic burnished onto the surface, position on the curved baking form, and slowly press the clay onto the form. When shaped to your satisfaction, slowly pull back the plastic. Bake.
Monday, August 20, 2012
Urban Urchins - Designing Interesting Beads
Creative process - one concept leads to another....and to another........
These hollow beads offer a wonderful exercise in surface design..... not getting any sleep!
These hollow beads offer a wonderful exercise in surface design..... not getting any sleep!
Sunday, August 19, 2012
The Creative Process - Visual Stream of Consciousness
So often the seeds of future creations lie in current work. One of the best ways of revealing that seed is to go as deep as you can into the current process. Often verbal cues can stimulate visual creativity, but so can visual cues. Stream of consciousness - the act of letting one word lead to another word, rapidly, uncensored, undirected, can reveal very interesting clues to connections between thoughts. The same can work with visual stream of consciousness. Starting from your current visual focus, let your mind wander and draw/sketch the first thing that comes to mind. Responding to that sketch, sketch the next visual and so on. Work quickly and try to not direct your thoughts but rather focus on responding.
Here is how it happens for me:
In working out more ideas from the Pegasus necklace:
After surface design ideas come shape ideas:
Then come ideas for connections:
Add surface design ideas and the mind is ablaze!
(please ignore the blue cast to the photo - image was taken outside in north light, early this am, so, lots of blue. I'll take better photos as this journey continues)
The new Urban Urchin Collection is created and I have so many ideas exploding in my brain I literally can't sleep!
Here is how it happens for me:
In working out more ideas from the Pegasus necklace:
After surface design ideas come shape ideas:
And now I'm zeroing in on a shape and a connection:
(please ignore the blue cast to the photo - image was taken outside in north light, early this am, so, lots of blue. I'll take better photos as this journey continues)
Urban Urchin Collection
Sunday, August 12, 2012
Final Take - The Pegasus Necklace
The Pegasus Necklace
In reassembling the necklace with black agate beads and brass spacers between the polymer elements, I feel it looks more dressy this way. I do the final sanding and buffing, keeping the high gloss for the Burlesque Blend accents and leaving a fairly matte surface for the black areas. The contrast between matte and shine, between flat and glitter, between dark and light, between solid and pattern pleases me.
The beads look fairly substantial but the work in making them "hollow" keeps the necklace from being heavy, so the time and effort to assemble the beads with internal support but no solid core was worth it.
Saturday, August 11, 2012
The Pegasus Necklace
The beads are done and now the final decisions involve the assembly. I've strung the beads on brass coated cable, but feel the cable looks too frail next to the overall look so I'll use softglass cord to go from the end beads to the brass hook-and-eye clasp. The decision involves the spacers. I've used leftover clay to make clay discs. I need a small black agate round bead to push the spacers away from the central bead. I'll restring the whole piece using a "slicker" alternative - brass spacers with a larger black agate bead in between - to see which one conveys the artistic "feel" I'm looking for. Here is the first alternative assembly:
The Pegasus Necklace
Monday, August 6, 2012
Designing Museum Quality Fine Art Jewelry - Part 3
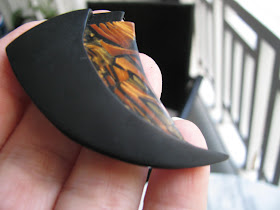
The two side pieces are finished and I've laid them out beside the layered centre piece. I'll need a bead or beads between the pieces to set them apart. I ran into a problem with the curvature since these side pieces are essentially hollow beads. This is going to be a fairly substantial piece so weight will become an issue. It was so difficult to ensure the curvature of the top black pieces matched the curvature of the larger bottom pieces, especially when the bottom pieces were baked on the round form and also had that soft curve. I decided to work the bottom black pieces flat. That way I could bake the top black piece, lay it on the flat clay and trace out the curvature exactly as needed. There is a curved, textured, glittered insert on the side, set in a bit so it is not obvious - just noticeable from an angle. Adds a bit of intrigue/interest to the piece. I'll need to be exact when drilling the hole for the wire, since any change in curvature of the wire will affect the wrap of the "claws" around the central bead. I don't have a neck mandrel so I'll try using the jewelry manikin.

I like the look of the side pieces as earrings. Will have to work some more up as such.
Designing Museum Quality Fine Art Jewelry - Part 2
I lay a single sheet cut from a page protector over the final side piece designs and draw the outlines of the various pieces with a sharpie. I label the pieces (I'm blond - I tend to confuse easily)
These are cut out with scissors and used as templates. I used to use acetates but found that they fuse with the clay and will lift off some of the surface clay when removed so I needed to spray with water each time as a release. More work, more clean-up. These page protectors (some artists store sheets of clay in them) stick to the clay but don't bond with it so the template stays put for cutting (fine surgical scalpel, disposable) but lifts cleanly off afterward.
Now to place on the form for baking (this is an old ikea glass lampshade - perfectly round) for a soft curvature.
I ran into a bit of a problem with this. The clay is so malleable that I pushed the tails up too far when placing the thinner black pieces on the form. The curvature of the thin black pieces do not marry with the wider black pieces so I'll have to cut new thin ones and use the template to draw the outline directly onto the form with a grease pencil, then use the outline to make sure the curve conforms to the original template.
Two invaluable tools
Sunday, August 5, 2012
The Creative Process - Designing Museum Quality Fine Art Jewelry
Sometimes ideas flow like a raging river. Other times you feel "dry as a stone", to quote Virginia Cobb. Some artists keep a sketchbook by their bedside, others journal their ideas. Me, well, I usually can't find what I need when the muse beckons. I start out with great intentions, but my sketchbook by my bedside is empty because the massive wave of creativity that washes over me as I drift off happens when I'm drifting off! I have about 50 sketchbooks/notebooks/journals, stuffed full of copy paper/napkins/junk mail covered with ideas, both visual and verbal, scattered throughout my environment. I pity the person trying to sort and categorize my creative thoughts/ideas after I'm "gone". There is no rhyme or reason; there is no logical order or linear time sequence. My mind works on the explosion process, images morphing into objects or wildly splattering across a canvas. Words appear and merge with color, contrasts jarring and exciting through texture or value or color. So I thought I would take you along with me on my process of creating this fall jewelry collection.
Yesterday's focal element didn't appear first. Here is the process unfolding in one sketchbook:
This is a shape that has appeared frequently in my abstract paintings. I really love this shape. This sketch led to:
Yesterday's focal element didn't appear first. Here is the process unfolding in one sketchbook:
This is a shape that has appeared frequently in my abstract paintings. I really love this shape. This sketch led to:
and
Now I'm in full gear and thinking about the whole piece, needing a central element:
The top drawing works out the logistics of assembling the round focal element featured in yesterday's blog. Studying that piece gives me ideas for the rest of the necklace, and the color ideas and shape and size for the side pieces get finalized on the bottom.
As you can see, I'm a process artist. The act of creating leads to more creating - but the pragmatist is always there, waving a finger at me, reminding me these things have to work in real life, so now it's time to make the prototypes for the side pieces.
More about this process tomorrow.
Saturday, August 4, 2012
Putting Together a Collection for Fall 2012 Fashion
I've been asked, by an exclusive clothing boutique in Montreal, to put together a Fall 2012 Jewelry Collection to sell in their store. I don't mind telling you, I'm excited! I'm thinking of changing my name - something chic - The Artist Formerly Known as Vickie????? I'll work on it.
The first color palette I'm working with is black and gold and bronze. I need to stay fairly elegant, yet arty and exclusive, so I've got a few ideas I'll show you over the next few days.
This is a focal piece for a necklace that I can already see in my mind's eye. It uses up some scraps from different techniques, which is always great, but requires a lot of hand cutting and hand shaping, so this will definitely be the centre of a very "arty piece".
Thursday, August 2, 2012
Warrior Women
All through history there have been Warrior Women, women who overcame tremendous obstacles to accomplish historical feats, women such as Queen Boudicca, Queen Artemisia, The Trung Sisters and Queen Zenobia, just to mention a few. All through history down to the present we have warrior women whose names have never made recorded history, but who daily overcome tremendous obstacles or endure difficult situations or bear heavy burdens just to care for those near and dear to them. These pins are dedicated to today's warrior women and I'll introduce my favorites from time to time.
The first is Lady Bernadette. She struggles with depression and lonliness yet always presents an elegant, cheerful face to those around her, not wanting to be a burden to anyone. Every day she manages to get to work or fulfill her responsibilities she has won a battle. Some days the battle overwhelms her. My Bernadette loves the colour green and has a smile that lights up a room. The green swarovski crystals trailing down her cheek are her tears and the dark pattern on the left side suggests the emotional veil she hides behind in order not to burden others with her pain. This pin is to let her know that there are many of us who recognize her valiant struggle and love and appreciate her.
The first is Lady Bernadette. She struggles with depression and lonliness yet always presents an elegant, cheerful face to those around her, not wanting to be a burden to anyone. Every day she manages to get to work or fulfill her responsibilities she has won a battle. Some days the battle overwhelms her. My Bernadette loves the colour green and has a smile that lights up a room. The green swarovski crystals trailing down her cheek are her tears and the dark pattern on the left side suggests the emotional veil she hides behind in order not to burden others with her pain. This pin is to let her know that there are many of us who recognize her valiant struggle and love and appreciate her.
Lady Bernadette


