Friday, April 12, 2013

Pretty in Pink


More Burlesque Blend pieces as I prepare to teach these upcoming workshops (yes, I'm anal-retentive, obsessive-compulsive!) The interesting thing about this particular colour combination is how beautiful it looks on all types of skin. Pasty-white or deeply-tanned, this just glows.

The design in this piece works well for me. The asymmetry of the pattern in the focal piece keeps the necklace from becoming boringly symmetrical; the large amount of pink in the two pieces flanking either side of the focal element draw the eye away from the middle and up towards the face; the next two flanking pieces, with the diagonal patterning moving diagonally down and out stop the eye from leaving and pulls it back to the central elements.

The finishing details often get neglected because one gets so focused on the clay technique. In this case, although the pink is very cool, suggesting silver would be a good accompaniment, the metallic sparkle in the 3 central pieces is more muted and casts a bit of a gold tint, which knocks back the colour intensity in the polymer and also allows me to choose spacer crystals that are metallic gold-tone with a hint of pink interference. These crystals are flanked on each side by an oblong, faceted black crystal and this combination really enhances the sparkling feel of this piece.


To finish off the necklace, round black agates are used instead of crystals, keeping the focus in the main polymer area and providing a very comfortable feel on the neck. Notice, though, that it is not just a bland, monotonous strand of beads. These agates are broken up periodically with a pink/gold interference tube seed bead, again adding interest, but not detracting from the main attraction.


I'm working out more colour combinations for variety for the students. It's not logistically feasible to structure a workshop so every student can choose every element, but colour is very personal, and where possible, I like to provide that choice while maintaining limits on size, shape, pattern, etc., as seen here:

Wednesday, April 10, 2013

Studio Tip #5: Slicing a Round Log

I'm up to my eyeballs preparing for the upcoming workshops that I'll be teaching over the next 4 weeks! In the meantime, here's a short video to show you how I slice round canes/logs, keeping them from flattening out on the bottoms or from squishing them. If your clay is very soft, let it sit for about 20 minutes before you slice (I must admit, I never have that amount of patience!) Polymer clay is "thixotropic". That means, like yogurt and acrylic paint, when you work it it becomes thinner, but when it then sits for a while, it firms up again (to varying degrees). Sorry about the music - I always have it on in the studio and consciously don't notice - it's that much a part of my creative process, lol.


Friday, April 5, 2013

Polymer Clay 101 - Chapter 1: Think Wax!

I have decided to post a series of basic information in addition to my regular posts.

This is the beginning of a monthly (hopefully!) series of posts that are intended to give you my experience with polymer clay and my observations of this unusual medium, from the bottom up. I would like to help new clayers to understand the medium, to become familiar with its quirks, so they can concentrate on creating, not getting bogged down because of "failures" due to technical problems. I'm a firm believer in there being no mistakes in creative endeavors, but it's heartbreaking and frustrating to have your efforts end up broken, burnt, or otherwise useless. This is meant solely to offer my lessons learned, observations made and conclusions drawn during my 24 years' progress as a polymer clay artist.

1: I don't think of polymer clay as "clay". It does not act like earthen clay at all. I have come to think of it in terms of "wax" as it behaves similarly to wax, and this reminder helps me when I'm working absentmindedly and not getting the results I would like. Wax softens with heat. So does polymer clay. I often pack the clay into my clothing before starting a day in the studio, and this warms up the clay safely. That does not mean warming up the clay results in "conditioned" clay - it just helps with the conditioning process. The clay still needs to be thoroughly mixed to redistribute component chemicals and yield a good, strong, final product.

Earthen clay takes an impression quite easily. Wax does not, neither does polymer clay, especially if it is not warm, soft and pliable, so there are several things you can do to help it warm up. Friction transfers kinetic energy to the clay, thus warming it a bit as you roll vigorously across the surface with your acrylic rod. Putting hard pressure does not do much to help. Think of putting pressure on a wax candle - see? Warming up your instruments (pasta machine, tile or glass work surface, etc. will help, mainly because these items tend to be cooler to the touch and suck the heat out of the clay as you work on it! So warming these up with a hairdryer (or a heating pad) before you start working, really helps.

Speed also impacts on the results. Unless your polymer clay is very warm, soft and pliable, you need to affect it slowly in order to achieve good results. For example, the images below show fairly softened clay run through the pasta machine rolling slowly (#1 - on the left) vs rolling quickly (#2 - on the right):
please click on image for larger picture
These pieces were conditioned, the same size, rolled on the same setting on the same pasta machine, using the same rubber stamp. The difference is due to the speed of rolling. Rolling slowly allows the clay to "yield" to the pressure and conform to the stamp shapes whereas rolling quickly causes a wave of clay to move ahead and the impressions are not as deep and are quite distorted.

Thinking of polymer clay as similar to wax helps to understand other things that happen. For example, translucent clay has a property known as plaquing - forming small, flat, roundish discs below the surface when baked. This is a wonderful quality when you want to mimic jade or some other stones, however, it can be a nuisance when you don't want it. The reasons for this occurrence are not fully understood, although some feel it may be moisture from your hands that contributes to it happening. In watching what happens when I run translucent clay through the pasta machine, it became evident that rolling too quickly tended to trap minute amounts of air in the clay, which looked like small, whitish striations barely visible below the surface. Rolling slowly, this did not happen. I feel that this is another situation where rolling quickly doesn't allow the clay to conform to surface differences, whereas rolling slowly does, and it gives the clay time to fill in depressions and air does not get trapped. This seems to be particularly important in translucent clay which, for some reason, seems more waxy than pigmented clay.

'nuff said! Please feel free to leave feedback.

Thursday, March 28, 2013

Mokume Gane - My Way: The Burlesque Blend

Spring is finally here, and, along with spring rains comes a packed spring teaching schedule! I'm home now for a couple of weeks, then off to Florida and after that, a final workshop to be given back here, in Montreal.   I'm focused on teaching the Burlesque Blend this year, so, for now, the rustic, gritty, organic stuff will have to take a back burner. I find it interesting to see the effect that teaching has on my creativity - it squelches it totally!!! I get so left brain that my family refer to me as "Sheldon". For those of you who watch The Big Bang Theory, you'll get the point. It becomes all about the chemistry, the physics, the engineering, even the mathematics (even Sandra is working out the math of her latest effort!) of the project. For me, it's important that students not only understand the "how" but also the "why" of a particular aspect of the technique. I've always felt that an artist who understands his medium is in the best possible position to explore and take risks, and therefore is more likely to make new discoveries. Putting all this information into digestible form is time-consuming and laborious, but I started out as a "lab rat" and I love it there!
I've come to realize that there are many new artists coming to polymer clay who don't have a solid background in the medium or in the basics of working with the medium. I would like to do a Polymer Clay 101 post, once a month, with progressive technical as well as technique information. Some of it you will undoubtedly already be familiar with, but there may be little tidbits that will help you with a niggling problem.

For example, I was asked to look at a bracelet that had broken after wearing. The artist asked if I had any idea what the problem was. She had not reinforced the bracelet with wire, but stated that she thought maybe the problem was that she had used an inferior clay, Premo. After picking my jaw up off the table, I told her that Premo is a high-quality, artist-grade polymer clay and not likely the cause of her problem. Ultimately it turned out the problem was not knowing what time or what temperature was needed to cure Premo properly. The result of too low a temperature and a very short cure cycle led to the breakage.

If you think this kind of monthly post would be of benefit, please leave a comment and let me know. If there are specific questions you have that you would like to see addressed in this post, please let me know. I'll be glad to do my best to deal with it.

Tuesday, March 5, 2013

Rustic Relics

Please click on the pictures for larger images
Yin and Yang, contrast - it is as vital in approach as it is in design. We've talked about taking a class - controlled, anticipated outcome. Now we'll talk about the contrast: the "fly by the seat of your pants, breathlessly, fearlessly, giddy with fear and expectation of what lies over the next rise" kind of contrast - going into the unknown, risking, experimenting. This is where intriguing discoveries are made, most often disguised as so-called mistakes. Judging an outcome as a mistake reveals that one has already set the parameters for the outcome of the effort. There is an expected result, and, barring achievement of that result, we judge the outcome a failure, a mistake.

Here I present my latest Eureka! Pretty? Not by any definition! Fabulous? Absolutely!
light shining through behind to show translucency of top

Here's how it came about. It was time for me to
experiment. I wanted to work with the ivory and add the feel of glass and get really rustic - the primitive ceramic/pottery/faience type rustic. My studio does not even remotely resemble those pictured in glossy magazines. I usually have to search around for a clear space that will hold my backside, so fat chance of finding a clear space to park a sheet of clay! (The Arctic Fox often suggests that he hang a large sheet of melamine/plywood from a pulley system bolted into the ceiling above my work surface. That way, when I run out of space, I can just winch a clean surface down onto the existing chaos and start fresh). He thinks he's witty!!!


I try to find a used piece of wax paper to place the sheet of bone/ivory clay down onto. I don't want to use deli wrap (silicon-too hard to find, or dry wax-leaches plasticizer) or plain paper (leaches also). I spot a piece and plunk the clay down. I make up the translucent, adding dry pigment, white acrylic paint, embossing powders-just a trace (white, black and pale turquoise) onto half the clay, roll out thinly, tear in half, place the relatively clean half on top, roll out thinly, then roll up roughly, leaving creases and overlapping edge, cut into sections about 1/4 the height I want the finished bead to be.


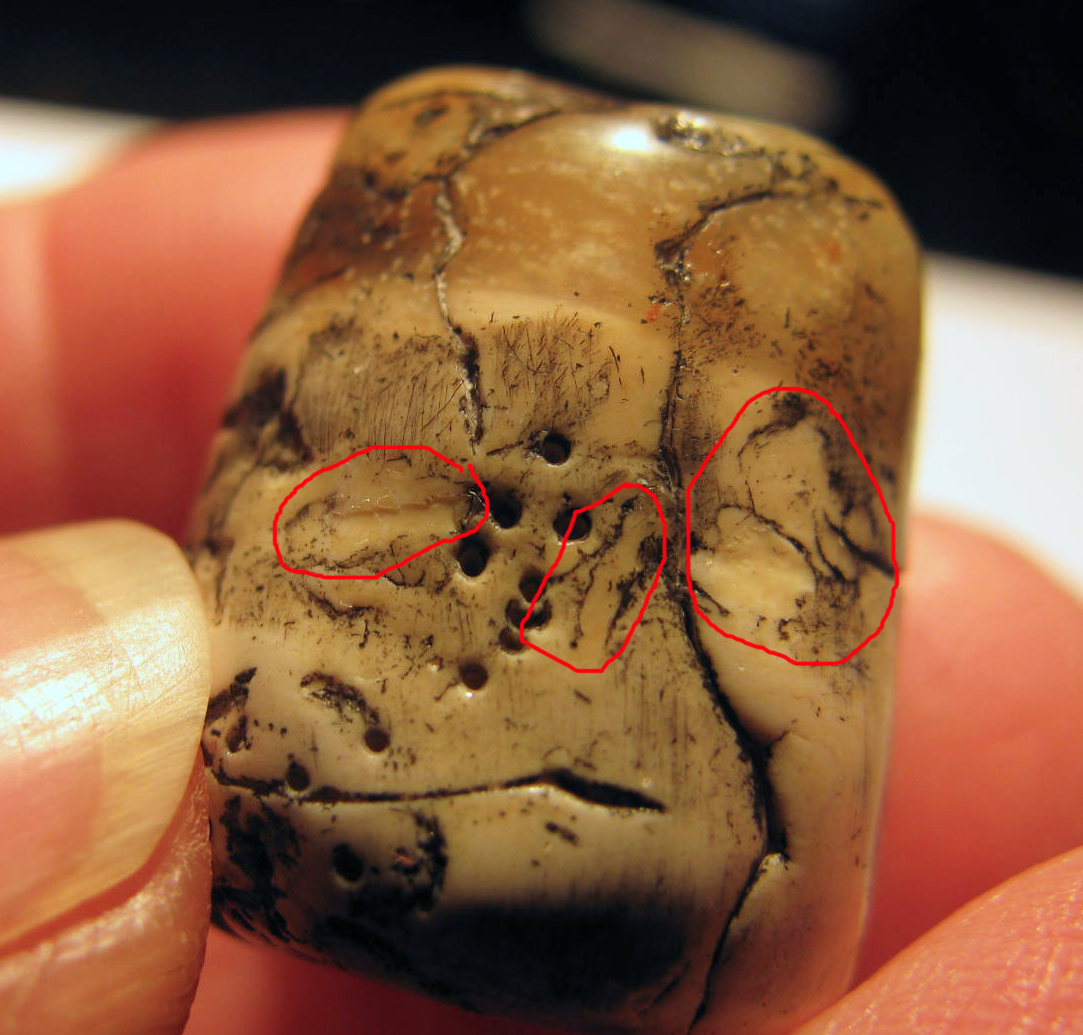
 I then pick up the bone/ivory sheet and notice something has stuck to my clay. It is thin, transparent, and brittle. I realize it is dried white glue. I use wax paper under items that I glue, and now I have dried glue on my clay. No problem. I know that PVA glue is very compatible with polymer clay (I bake it into the cores of thin bangles braced with paper). I'll just leave it. It will probably just disappear. I roll up the bone/ivory, shape it into the bead, affix the translucent on top, blend the two, distress with my favorite texturizing tools (another post another day) and bake. I decide this time to antique with black acrylic paint because I don't want oil paint staining into the surface of this bone/ivory (maybe my right brain knew something I didn't!).

without the red outlines

I wipe off the excess paint with a damp rag and notice distinct spots that have taken no paint at all, smooth in the midst of texture, outlined with strong detail! I love the look! It has to be the dried glue. It prevented the texture from affecting that area and being dried and brittle when attached, it "broke" when manipulated into shape. (I will play around with this and see where it takes me) Knowing that I've used acrylic paint for the antiquing, and that acrylic paint buffs to a beautiful high gloss, I use the buffer to make it gleam. It really fascinates me! I ask The Arctic Fox why I find this so much more intriguing and delightful than all the "pretty" pieces I make periodically. He responds, "Because you love the process!" He's absolutely right! Don't tell him - he's already too male!

Sometimes it's good to push through your "mistakes"!

Some more images below:

Friday, March 1, 2013

Annus Horribilis!

My first attempt at a Rock Cuff Bracelet
After the fire at Buckingham Palace, The Queen stated the above! Ditto! 6 weeks of Whooping Cough, a  failed colonoscopy (the doctor finally told me he was going to stop the procedure and end the torture), and now major dental work on all 4 quadrants - I'm swimming through a red fog of pain and wondering if this is what the writer meant who said, "old age is not for the faint of heart!" My poor little right brain is cowering in a far corner, whimpering and making weird gestures with her hands. Will she ever risk the cold hard light of reality again? What to do? What to do?


I know! Take a class!

Not only does a class relieve you of having to make any decisions, it's delightful and approved playground time and it keeps you current with progress being made by leaders in the field. Regardless of how many years you have been working with polymer clay, there are still new techniques being developed and you may find it sets you off on entirely new path in your efforts. If you find that the work of a particular artist is intriguing, beguiling and leaves you wondering how certain aspects were done, take the class. If you can attend one in person, that's even better. The camaraderie will lighten your spirits considerably, and, as my Arctic Fox says, "Creative people need to be with creative people." However, if that is not possible, this is the age of technology and classes are given on dvd, online, and through podcasts, and they are frequently of high caliber. Thank you Melanie Muir and Alison Lee of Craftcast. Melanie has a Craftcast class (moderated by Alison) that is fabulous. She has amalgamated many existing techniques and added her own twist and come up with a wonderful, entertaining, instructive class on her Rock Cuff Bracelets. For over an hour I lost myself in her wonderful Scottish burr and her lucid and logical instruction. She holds nothing back, and, what makes me happy, does not require you to purchase scarce items to accomplish a beautiful end result. Thanks again, ladies. You managed to get me hoping this new year will be an Annus Mirabilis!

PS. No, this is not a paid advertisement. These ladies do not know I'm posting this (I hope they don't mind!)


Wednesday, February 13, 2013

Mokume Gane

I just finished my babysitting gig and I must admit - 3 young boys (my grandsons) wear you out!!! I had 2 girls and they were emotionally draining, but boys - let's just say I need about a week's bedrest!

My last post detailed the cane I made from the scrap left over from my first attempts at mokume gane, 18 years ago. The slices from the mokume gane stack that I demoed turned out so well I made some beads from them. As you can see, even this primitive form of mokume gane yields some nice results.

The key with mokume gane is CONTRAST. That's a very important design principle. To me it's one of the most important. If I show you a sheet of white paper what would you see? Probably not much. However, if I put two black dots and a larger black triangle between and below them, you could see that it obviously is a picture of a polar bear in a snowstorm :-)

The point is that the white defines the black and the black defines (or "informs" as some purists put it) the white. There are many design elements that can be manipulated to provide contrast: shape (organic vs geometric), line (thick vs thin), texture (smooth vs rough), colour (hue, saturation (pure vs dull), temperature (warm vs cool), value (light vs dark), just to mention a few.

Over the next few weeks I'll be discussing my experimentation with mokume gane and give a few tips on my way of doing this amazing technique.