
 |
| Please click on the pictures for larger images |
Here I present my latest Eureka! Pretty? Not by any definition! Fabulous? Absolutely!
 |
| light shining through behind to show translucency of top |
Here's how it came about. It was time for me to
experiment. I wanted to work with the ivory and add the feel of glass and get really rustic - the primitive ceramic/pottery/faience type rustic. My studio does not even remotely resemble those pictured in glossy magazines. I usually have to search around for a clear space that will hold my backside, so fat chance of finding a clear space to park a sheet of clay! (The Arctic Fox often suggests that he hang a large sheet of melamine/plywood from a pulley system bolted into the ceiling above my work surface. That way, when I run out of space, I can just winch a clean surface down onto the existing chaos and start fresh). He thinks he's witty!!!


 I then pick up the bone/ivory sheet and notice something has stuck to my clay. It is thin, transparent, and brittle. I realize it is dried white glue. I use wax paper under items that I glue, and now I have dried glue on my clay. No problem. I know that PVA glue is very compatible with polymer clay (I bake it into the cores of thin bangles braced with paper). I'll just leave it. It will probably just disappear. I roll up the bone/ivory, shape it into the bead, affix the translucent on top, blend the two, distress with my favorite texturizing tools (another post another day) and bake. I decide this time to antique with black acrylic paint because I don't want oil paint staining into the surface of this bone/ivory (maybe my right brain knew something I didn't!).
 |
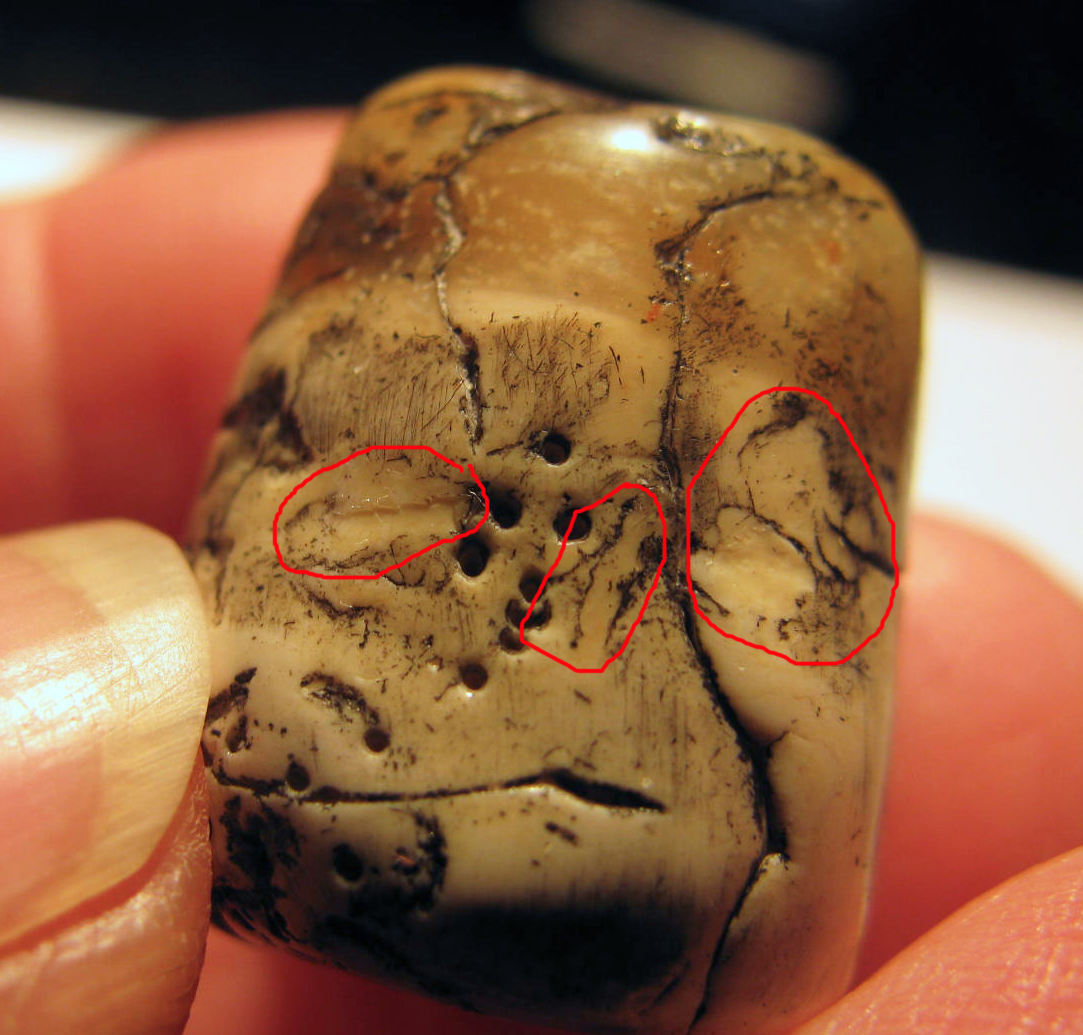
| without the red outlines |
 I wipe off the excess paint with a damp rag and notice distinct spots that have taken no paint at all, smooth in the midst of texture, outlined with strong detail! I love the look! It has to be the dried glue. It prevented the texture from affecting that area and being dried and brittle when attached, it "broke" when manipulated into shape. (I will play around with this and see where it takes me) Knowing that I've used acrylic paint for the antiquing, and that acrylic paint buffs to a beautiful high gloss, I use the buffer to make it gleam. It really fascinates me! I ask The Arctic Fox why I find this so much more intriguing and delightful than all the "pretty" pieces I make periodically. He responds, "Because you love the process!" He's absolutely right! Don't tell him - he's already too male!
Sometimes it's good to push through your "mistakes"!
Some more images below:


This is great!! I love the look of it and how it came about. And I appreciate so much how freely you share all your polymer knowledge. Thanks!!
ReplyDeleteThanks so much for your comment, Zendegy, it helps me keep on trucking, lol! Vickie
DeleteHere you go again Vickie, another winner. Is that the cad yellow,burnt umber,trans bone recipe? I really like how the light goes through it. That dried glue is a great inclusion, even if it was accidental. Be careful that it doesn't scratch your rollers. I have a Makins machine that I scratched the rollers using texture sheets, I think. I bought some new rollers, but then decided to use it just for rolling texture sheets and things with inclusions that might scratch. Now I have an extra set of rollers in case I do scratch another one.I'm going to play around with that glue idea.
ReplyDeleteHealing vibes coming your way.
Jay
Sorry Vickie,
ReplyDeleteI reread the article and saw the recipe you used for the bead. What is the dry pigment. I'm not familiar with. PearlEx or Pastel Pearls, maybe?
Thanks,
Jay
This comment has been removed by the author.
DeleteHi Vickie, I hope you are well. Since you haven't posted lately and have had some previous health problems, I have been concerned. Good vibes sent.
DeleteIn my last post I said "It is beautiful?" I meant,"It is beautiful." without the question mark.
Hope to hear from you soon.
Take care, Jay
Hi Jay, for you, here's the scoop: NuPastels by Prismacolor. It's a sienna-ish color (no name on the stick). They are a harder pastel so don't go to dust when scraped. I scraped the edge with an x-acto knife. Gives nice small particles and gorgeous color. I use them often at the start of abstract paintings. I think you could use some other pastels if they were a bit hard. Maybe Grumbacher or Rembrant. Sennelier and Holbein would be too soft. I'll bet you could use oil pastels as well (particles will probably be stickier and tend to smear, but that may be interesting). I'll try that out and get back to you on that. Craypas make an inexpensive oil pastel.
DeleteAs for the bead, the ivory/bone is the recipe above. That comprises about 3/4 of the bead. The remaining 1/4 is the Premo translucent dusted with the dry pigment, lightly brushed with white acrylic paint (I often use acrylic gesso instead of paint - it dries matte). It really does glow, eh?
I know what you're saying about the rollers - it doesn't seem to take much to scratch the new machines. I've bought about 4 old Italian pasta machines from the thrift stores over the years. I'm sure they are made of tempered steel, lol! They are the most incredible workhorses! Only problem is they aren't very wide so the width of a sheet is limited.
And yet again I am stunned. Gorgeous stuff mom! And if anyone ever knew how accurate you were being about finding a clean workspace...lol! Makes me want to come up there and tidy up for you!
ReplyDeleteThank you, sweetheart! LOL, I know you well know my "clear space" issues. Weren't there days when you didn't know where to step because even the floor was totally covered??? You should write this down for my Irish "wake" - She finally found a clear space to park her buttocks!
DeleteHi Vickie,
ReplyDeleteIt's me again, Mr Nosey. I've read your post many times and cannot find anything that says what the final article you made is? It is beautiful? Maybe it is part of something that isn't something yet. Pendant? I don't see the new beads on it. I really like that wirework and those pounded copper paddles. You just keep coming up with some great stuff. I have played around with copper a bit and really like it. The best patina I've come up with was on a strip of sheet copper that I wrapped around my dwarf lemon tree to keep the snails away. I've heard that Miracle Grow plant fertilizer works for patina, but haven't tried that yet. Same for liver of sulfer. I guess you hammer the copper first, then patina it. That was a great deduction. Huh.
Thanks, Jay
Healing Vibes
Hi Jay,
ReplyDeleteSorry I haven't posted pics of the final necklace yet. I've had to prepare for a few workshops that I teach in the spring, and experimentation is on the back burner for now. I needed to make a few more things for this next piece, namely some faux beach glass. I want this piece to be of the ocean and beach and the title for this piece will be The Surf Sweeper. More to come.
Like you, I love working with metal and patina. The liver of sulfur is good, but I love the heat patina I get on copper, especially. I've been playing around with embossing powder and I'll show you some pics as soon as soon as I'm finished teaching, mid-May, most likely.
PS. I've heard that cat food on copper, then torched, yields beautiful patina. Haven't tried it myself, yet.
Hi Vickie,
DeleteI'm so glad to hear from you again and hope that you are well. I was afraid that maybe you were ill again as you mentioned before. I checked your site everyday, sometimes two or three times. Hope all is well.
The necklace you are making sounds great. I have made some faux beach glass and was happy at how it turned. Putting it to use is another matter.
I like the look of torched copper, if that's what you are mean. Now for the cat food. I assume that means wet cat food? Although, with the ungodly things they put in cat food, buried in dry might work too. I have heard that putting the copper in the litter box works, but I prefer to stay away from that one and just try household ammonia. Then again the litter box patina might be interesting. I do have a cat. Hummmmmm.....
LOLROTF!!!!! I can just picture your cat, watching you burying copper in the litter box, hitting it with the torch, thinking "There's no way I'm ever going near that litter box again!". Yes, I was talking about wet cat food, dotted around the copper, torched and cleaned off. Apparently fabulous colours. Ammonia's interesting. Haven't tried that. I have a formula (somewhere!). I'll look it up and get back to you. Makes great verdigris. Have a great one.
DeleteVickie
PS. I love cats! I think they are creative muses in disguise!