Thursday, March 28, 2013

Mokume Gane - My Way: The Burlesque Blend

Spring is finally here, and, along with spring rains comes a packed spring teaching schedule! I'm home now for a couple of weeks, then off to Florida and after that, a final workshop to be given back here, in Montreal.   I'm focused on teaching the Burlesque Blend this year, so, for now, the rustic, gritty, organic stuff will have to take a back burner. I find it interesting to see the effect that teaching has on my creativity - it squelches it totally!!! I get so left brain that my family refer to me as "Sheldon". For those of you who watch The Big Bang Theory, you'll get the point. It becomes all about the chemistry, the physics, the engineering, even the mathematics (even Sandra is working out the math of her latest effort!) of the project. For me, it's important that students not only understand the "how" but also the "why" of a particular aspect of the technique. I've always felt that an artist who understands his medium is in the best possible position to explore and take risks, and therefore is more likely to make new discoveries. Putting all this information into digestible form is time-consuming and laborious, but I started out as a "lab rat" and I love it there!
I've come to realize that there are many new artists coming to polymer clay who don't have a solid background in the medium or in the basics of working with the medium. I would like to do a Polymer Clay 101 post, once a month, with progressive technical as well as technique information. Some of it you will undoubtedly already be familiar with, but there may be little tidbits that will help you with a niggling problem.

For example, I was asked to look at a bracelet that had broken after wearing. The artist asked if I had any idea what the problem was. She had not reinforced the bracelet with wire, but stated that she thought maybe the problem was that she had used an inferior clay, Premo. After picking my jaw up off the table, I told her that Premo is a high-quality, artist-grade polymer clay and not likely the cause of her problem. Ultimately it turned out the problem was not knowing what time or what temperature was needed to cure Premo properly. The result of too low a temperature and a very short cure cycle led to the breakage.

If you think this kind of monthly post would be of benefit, please leave a comment and let me know. If there are specific questions you have that you would like to see addressed in this post, please let me know. I'll be glad to do my best to deal with it.

Tuesday, March 5, 2013

Rustic Relics

Please click on the pictures for larger images
Yin and Yang, contrast - it is as vital in approach as it is in design. We've talked about taking a class - controlled, anticipated outcome. Now we'll talk about the contrast: the "fly by the seat of your pants, breathlessly, fearlessly, giddy with fear and expectation of what lies over the next rise" kind of contrast - going into the unknown, risking, experimenting. This is where intriguing discoveries are made, most often disguised as so-called mistakes. Judging an outcome as a mistake reveals that one has already set the parameters for the outcome of the effort. There is an expected result, and, barring achievement of that result, we judge the outcome a failure, a mistake.

Here I present my latest Eureka! Pretty? Not by any definition! Fabulous? Absolutely!
light shining through behind to show translucency of top

Here's how it came about. It was time for me to
experiment. I wanted to work with the ivory and add the feel of glass and get really rustic - the primitive ceramic/pottery/faience type rustic. My studio does not even remotely resemble those pictured in glossy magazines. I usually have to search around for a clear space that will hold my backside, so fat chance of finding a clear space to park a sheet of clay! (The Arctic Fox often suggests that he hang a large sheet of melamine/plywood from a pulley system bolted into the ceiling above my work surface. That way, when I run out of space, I can just winch a clean surface down onto the existing chaos and start fresh). He thinks he's witty!!!


I try to find a used piece of wax paper to place the sheet of bone/ivory clay down onto. I don't want to use deli wrap (silicon-too hard to find, or dry wax-leaches plasticizer) or plain paper (leaches also). I spot a piece and plunk the clay down. I make up the translucent, adding dry pigment, white acrylic paint, embossing powders-just a trace (white, black and pale turquoise) onto half the clay, roll out thinly, tear in half, place the relatively clean half on top, roll out thinly, then roll up roughly, leaving creases and overlapping edge, cut into sections about 1/4 the height I want the finished bead to be.


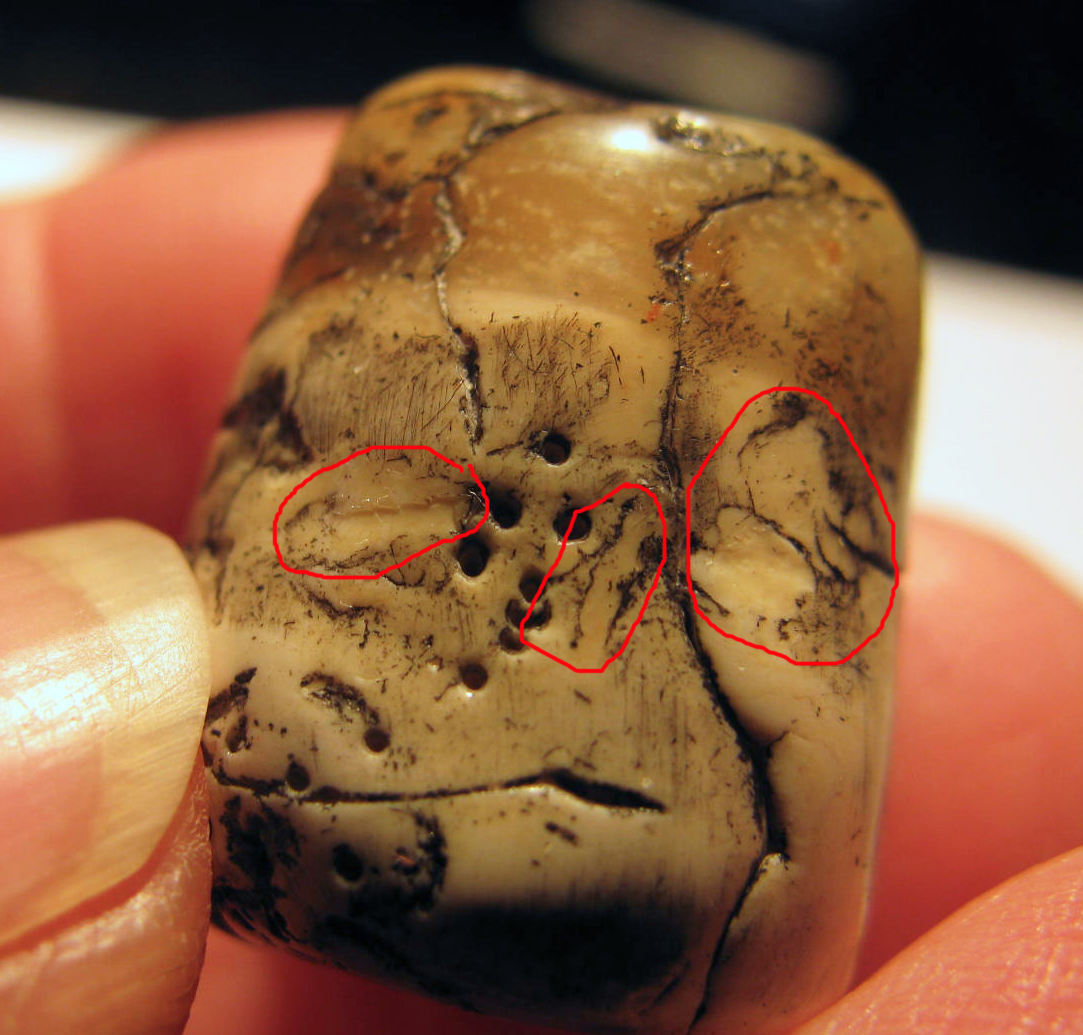
 I then pick up the bone/ivory sheet and notice something has stuck to my clay. It is thin, transparent, and brittle. I realize it is dried white glue. I use wax paper under items that I glue, and now I have dried glue on my clay. No problem. I know that PVA glue is very compatible with polymer clay (I bake it into the cores of thin bangles braced with paper). I'll just leave it. It will probably just disappear. I roll up the bone/ivory, shape it into the bead, affix the translucent on top, blend the two, distress with my favorite texturizing tools (another post another day) and bake. I decide this time to antique with black acrylic paint because I don't want oil paint staining into the surface of this bone/ivory (maybe my right brain knew something I didn't!).

without the red outlines

I wipe off the excess paint with a damp rag and notice distinct spots that have taken no paint at all, smooth in the midst of texture, outlined with strong detail! I love the look! It has to be the dried glue. It prevented the texture from affecting that area and being dried and brittle when attached, it "broke" when manipulated into shape. (I will play around with this and see where it takes me) Knowing that I've used acrylic paint for the antiquing, and that acrylic paint buffs to a beautiful high gloss, I use the buffer to make it gleam. It really fascinates me! I ask The Arctic Fox why I find this so much more intriguing and delightful than all the "pretty" pieces I make periodically. He responds, "Because you love the process!" He's absolutely right! Don't tell him - he's already too male!

Sometimes it's good to push through your "mistakes"!

Some more images below:

Friday, March 1, 2013

Annus Horribilis!

My first attempt at a Rock Cuff Bracelet
After the fire at Buckingham Palace, The Queen stated the above! Ditto! 6 weeks of Whooping Cough, a  failed colonoscopy (the doctor finally told me he was going to stop the procedure and end the torture), and now major dental work on all 4 quadrants - I'm swimming through a red fog of pain and wondering if this is what the writer meant who said, "old age is not for the faint of heart!" My poor little right brain is cowering in a far corner, whimpering and making weird gestures with her hands. Will she ever risk the cold hard light of reality again? What to do? What to do?


I know! Take a class!

Not only does a class relieve you of having to make any decisions, it's delightful and approved playground time and it keeps you current with progress being made by leaders in the field. Regardless of how many years you have been working with polymer clay, there are still new techniques being developed and you may find it sets you off on entirely new path in your efforts. If you find that the work of a particular artist is intriguing, beguiling and leaves you wondering how certain aspects were done, take the class. If you can attend one in person, that's even better. The camaraderie will lighten your spirits considerably, and, as my Arctic Fox says, "Creative people need to be with creative people." However, if that is not possible, this is the age of technology and classes are given on dvd, online, and through podcasts, and they are frequently of high caliber. Thank you Melanie Muir and Alison Lee of Craftcast. Melanie has a Craftcast class (moderated by Alison) that is fabulous. She has amalgamated many existing techniques and added her own twist and come up with a wonderful, entertaining, instructive class on her Rock Cuff Bracelets. For over an hour I lost myself in her wonderful Scottish burr and her lucid and logical instruction. She holds nothing back, and, what makes me happy, does not require you to purchase scarce items to accomplish a beautiful end result. Thanks again, ladies. You managed to get me hoping this new year will be an Annus Mirabilis!

PS. No, this is not a paid advertisement. These ladies do not know I'm posting this (I hope they don't mind!)


Wednesday, February 13, 2013

Mokume Gane

I just finished my babysitting gig and I must admit - 3 young boys (my grandsons) wear you out!!! I had 2 girls and they were emotionally draining, but boys - let's just say I need about a week's bedrest!

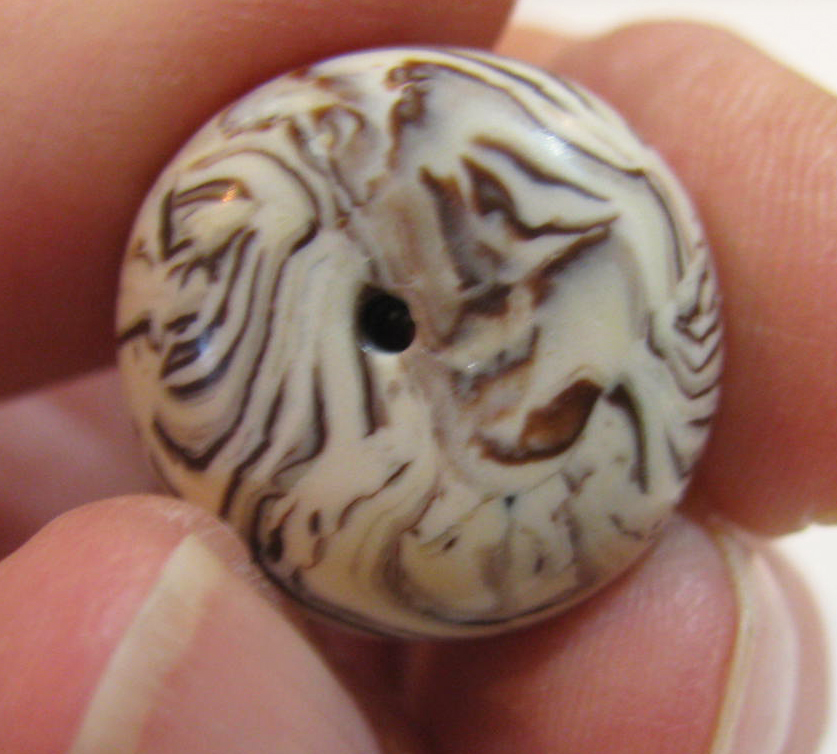
My last post detailed the cane I made from the scrap left over from my first attempts at mokume gane, 18 years ago. The slices from the mokume gane stack that I demoed turned out so well I made some beads from them. As you can see, even this primitive form of mokume gane yields some nice results.

The key with mokume gane is CONTRAST. That's a very important design principle. To me it's one of the most important. If I show you a sheet of white paper what would you see? Probably not much. However, if I put two black dots and a larger black triangle between and below them, you could see that it obviously is a picture of a polar bear in a snowstorm :-)

The point is that the white defines the black and the black defines (or "informs" as some purists put it) the white. There are many design elements that can be manipulated to provide contrast: shape (organic vs geometric), line (thick vs thin), texture (smooth vs rough), colour (hue, saturation (pure vs dull), temperature (warm vs cool), value (light vs dark), just to mention a few.

Over the next few weeks I'll be discussing my experimentation with mokume gane and give a few tips on my way of doing this amazing technique.

Saturday, January 26, 2013

Old Canes Never Die...

.... unless they are cured! But here's the reality of clay - it can start to cure at 90 degrees Fahrenheit (Kato starts to cure at 115 degrees F)! So those of you living in warm climates - beware!


I've seen a fair bit on blogs and pinterest lately about warming up old clay. The suggestions have been to put the clay in a ziplock bag and drop it into a bowl of hot water, or to put it on a heating pad. These ideas are only of use if you carefully monitor the temperatures involved, otherwise you may be shortening the shelf-life of your clay.

Polymer clay doesn't really dry out as there is no water in there to evaporate. The chemicals that comprise polymer clay may separate a bit with time, but mixing these properly yields a product good as new.

The best way to store clay is in a cool, dark place. Light, even artificial light, affects clay because UV radiation breaks down polymer over time.

Warming clay up against your body is a good idea because, although your internal temperature is around 98.6 F, your surface skin temperature is usually around 10 degrees lower. This bead was just made with clay that is 18 years old!


I've decided to use up all my old clay canes and other experiments. With the pendants I'm currently making,
like the Wind Whisperer, I want some rustic, ancient, woody/bone/resin type beads, and I saw this cane buried under a pile of old experiments. I had made my first mokume gane and didn't understand the role translucent played in highlighting metal leaf in this process so the result wasn't totally satisfactory since much of my silver leaf disappeared, hidden by the opaque bone layer. I then took all the scraps and stacked them and rolled a log, sliced it lengthwise into long, 1/4 rounds, flipped and reassembled them to experiment with the Natasha bead technique. the result was this cane.


I only have 4 inches left, and, although I'm taking thin slices and covering scrap clay to make the beads, I'm a post-war baby and start to panic when I think I'm running out of something I find useful, so the following is to show you my process for reproducing this look (since I didn't keep lab books for my clay experiments when I first started out!)

I used Premo white, beige, ecru and burnt umber. I used silver leaf (aluminum, not sterling)
I had mixed up an ivory using ecru, white and burnt umber but I've since changed to cad yellow, white and burnt umber so I'm using the new formula for ivory. I then mixed up some of this ivory with more burnt umber and beige to make the mid-brown, more translucent piece shown here.

The sheets were rolled out on the thickest setting and cut the same size and shape and the silver leaf adhered to the medium brown piece.

These were stacked from dark to light. You'll notice that they are not perfect rectangles. I prefer to do mokume gane this way since I pinch and stretch and compress the stack till it takes the shape of a rectangle. In doing this I am distorting the layers slightly and I find this enhances the variation of the colour patterns when I slice thin sheets off.

Flatten this sandwich out till it fits through the thickest setting on the pasta machine. Roll through. Cut in three, stack, roll through again, cut in three, stack, press onto a tile or glass surface so it adheres well and then even up the edges a bit.


 Spray the surface with water as a release agent and use various implements to distort the surface. When using straws  or metal tubes to cut small circles, I spray water up into the tube to help keep the clay from sticking and getting pulled out of the stack. I use a rocking/circular motion as I gently press down and also as I slowly remove the texturizing tool. This helps keep the clay in the stack.
Use a paper towel to remove as much water as you can, flipping the tile over to drain any water out to the surface so you can absorb it. You don't want water trapped in the clay.

Press the stack together and roll your acrylic rod to compress the stack a bit to adhere the cut pieces so they don't fall completely apart when you slice.

For slicing I use the Thomas Scientific blade(shown in the post "Demo Part 1: The Ossifibulous Bracelet"), a new one. I clean the blade with a baby wipe between each slice. If you have difficulty controlling the blade, raise the stack up onto a scrap stack BEFORE you begin making the patterns in the stack (so you don't lose the tight grip the clay has on the surface). Take your time slicing. It is easier to feel the angle of the blade and make minor adjustments if you are going slowly. The movement that works best for me is a slicing movement slightly on the diagonal as I am drawing the blade towards me. That way you are cutting, rather than pushing the clay.

Check out both sides of the slice to see which one you like the best. I place my slices on wax paper so I can lift the paper afterwards, look at the patterns from underneath and decide which slices I want to flip over.

This tiny stack and slow slicing yielded 8 full and 2 3/4size usable slices - that's great!


This was a nice side benefit of reconstructing the old scrap cane, but now it's time to stack the scrap left over, including any solid pieces of ivory. I stack it all, stretch, adding thinned out ivory to separate the darker layers, then roll this stack into a log. Cut the log lengthwise, then cut each long half in half lengthwise again so you have four longish quarter rounds. Flip these over and assemble as per a Natasha bead (if you don't know or can't find instructions for the Natasha technique, leave a comment and I'll show it on the blog)


The original bead made 18 years ago from the original mokume gane scrap (I like to keep one bead for reference and future development)


The new bead.

Friday, January 18, 2013

Demo Part 2 (of 2): The Ossifibulous Bracelet

Please click on photos for larger images
I'll have to rename my studio the "Turner Trench" because of all the ancient relics that have been unearthed here - faux fossilized bone, fossilized husband (aka The Arctic Fox) - just kidding, honey! I've just been told that the above line is classic passive/aggressive behaviour - no! Really?!!


Let's pick up where we left off.
When you have covered the entire bracelet with the faux bone it should look something like this (I couldn't get the auto focus to work until I placed a strong contrast shape in the field!)


There will be variation in thickness of the slices, overlapping areas and bare areas - in other words, it will be very irregular.


At this point I use my handy-dandy WABL wand (designed by me, named by me after me, purely for posterity's sake; no ego involved whatsoever, I swear!) You could use a large knitting needle. I like this thin acrylic wand because I can see through it. Anyway, I use this to smooth out all the irregularities by rolling them out to the outer edge, following the direction of the striations on the faux bone slices. I also use my fingers to smooth areas difficult to reach with the wand and to distort the striations a bit.

This helps to create randomness in the outer edge because areas with thick or overlapping slices will bulge out slightly on the outer edge, creating irregularity which, if you choose, you can remove, or keep as part of the design shape.


All smoothed out.


It's time to create the focal edge. The original bracelet has a dark grey, almost leather-look edge and it goes very will with silver accessories.


I wanted this one to have a more mechanical, steampunkish remnant that related to gold, or warm tones.


To find more detailed directions for making this, please go to the Scrap Clay Process post earlier in the blog. You can find this easily by going to the small "search" window on the left, lower down, of the main page and typing in "scrap clay process". Any of my posts that involve this process will come up in a list and you can choose the one you want - in this case I believe it is Sept. 29, 2012 - Scrap Clay Process. Ok, ok, I know, I am Sheldon incarnate (with a touch of Penny thrown in to humanize me!)


Tear off (or cut - your choice) a piece and apply over the edge. Add some detailing (in this case I want to simulate riveted plates of metal)


Distress the faux bone veneer if desired as described in the first faux fossilized bone video. This picks up the paint used to antique and adds a lot of interest to the piece. You will see this at the end.

It's time to add the finishing touches - bling!


You will need to experiment with the amount of black clay in the little ball that forms the bezel around the flat-backed crystal. You want enough that it bulges up around the sides and holds the crystal in place, but not so much that it overwhelms the crystal. I make all the balls at the same time so the sizes will be the same for all crystals of a particular size. It's frustrating when you get the perfect crystal setting and don't know how big a ball you used to get it! Flatten the ball slightly before you set it in place.


Place the flat-back crystal (I use Swarovski's - they are really beautiful!) on the flattened ball. Use the flattened back end of a paint brush or rubber-tipped clay tool to gently, evenly push the crystal down till the sides come up and encase the crystal. If you want you can use a rubber-tipped clay tool to gently push the edges in so they hold the crystal firmly. If you are worried that it won't hold, gently pry the crystal off and glue down with a tiny bit of cyanoacrylate glue.


Here is the bracelet ready for the oven. I place it on a double layer of polyester batting and cover with foil. Bake about 1 hour.


Here it is after sanding to 1000, antiquing with oil paint (half black, half burnt umber) and buffing on the Foredom.


Both sides of the new one. You can see the difference in the faux fossilized bone in the two bracelets. The one with the charcoal attachment has a finer, more even bone striation, whereas the one with the bronzey metal attachment has a more irregular striation with much more translucent, yielding more dark areas peeking through.