Sunday, May 20, 2012

I Lied - or, How to Begin the Process of Creating

No, Wendell didn't start the ball rolling, his talon did!!!
In exploring peyote stitch beading I made my first dragon's talon and that led to Wendell. Since everything I look at, touch, sniff, hear and smell somehow segues into modular art and connections, the Talon evoked the idea of grasping, grasping what? I have a passion for smokey quartz, so I'm thinking, hmmmmm, beads, gemstones, precious metal, hand sculpted fine art, original attachments - many of them! Many combinations! Many options! And so it began........ Modular - it has to be convertible - necklace to bracelet in different permutations and combinations. Here is one possibility:


Three smokey quartz bracelets, strung on wire, sterling silver Hill Tribe beads, sterling silver spacers, beaded loops, sterling hook clasp:


Hooked the other end they form a bracelet:


What else can they be?


Another strand of smokey quartz, crystal spacers, handmade sterling silver clasp - a beautiful choker, also, double wrapped around the wrist, another bracelet. What else?


Add one bracelet strand - a beautiful opera length necklace. Or.....


Add the second bracelet strand - a slightly different necklace. Or....


Add the third bracelet strand - again a different necklace. Or...


How about two bracelet strands? Or...


What about all three? Or...


Let's fit Wendell in there, and then.....


Let's balance it with his talon on the other side. A closer look at these two components:

The Talon holding the three bracelet strands

Wendell


Now let's move things around a bit:

The Talon on the same side with Wendell

A close-up

No bracelet strands or talon

Wendell dangling choker style

The Talon hanging from Wendell's precious sterling hoop

a close-up

I ran into some difficulties in this wonderfully convoluted process and I'll share these with you next time, detailing what changes had to be made and how it ended up.


Friday, April 27, 2012

Modular Art Jewelry: How to Create and Connect Unique Component Jewelry

I'm obsessed! I now know where the term "dumb blonde" came from. These days I fit the profile to a "T"! Anyone sitting across from me on the Metro, or at a cafe table would come to the same conclusion - vacuous stare, mouth slightly open, oblivious to noise and visual input, no visible "plugged-in" paraphernalia - yep, she must be a dumb blonde...........duh, not! I'm deep in my head, connecting and reconnecting components, creating focal elements, stringing, attaching, dangling, embellishing, engineering, designing and composing. I should be sketching these things out then people would know what's happening, but I don't have time - these ideas have been percolating, gestating for a long time and I can no more stop the flow than the tide!!!

Over the next couple of weeks I'll present individual components and connections and then we'll play around with variable arrangements and compositions. I'll give you a look into my "dumb blondeness", ie. the process that leads me to these ideas since this, to me, is the essence of creativity - the "process". I much prefer NOT knowing what I will end up with when I start. It can be very disconcerting, at times downright painful, but the reward comes as the piece evolves and you see your own creative process unfolding before you. My process working with polymer and metal is remarkably consistent with that inherent in my abstract paintings (see http://www.vickieturnerart.blogspot.com/). Input and comments are always welcomed.

Meet Wendell. I never thought I could be a sculptor, but Leslie Blackford showed me differently. Thanks to her, the name emerges first, becoming the structure upon which the personality grows, followed by the physical features. Wendell is shy, a bit geeky, like me, blinged-out with pearls and a swarovski crystal (tastefully, of course) clutching a precious find, a sterling hoop, a secret treasure to bring back to the lair to explore and delight in, to ponder, to create with. Christi Friesen's quirky dragons lay eggs that hatch in my imagination with curious regularity, testimony to the fact that part of me will always dream of mythical sagas, of adventure and mystery, imagined creatures and universes, more creative material. Wendell becomes the first creative part of this process. His hoop directing the next line of creative thought.

WENDELL - PART 1


Friday, March 30, 2012

Sculpted Polymer Clay Relics

I love ancient relics, and I love materials that become beautiful with wear. I love the fact that polymer clay lets me create artifacts that appear to be centuries old, uncovered by careful archaeologists gently brushing away the dusts of history. So, here are the latest. From faux jade to faux fossilized ivory, faux porcelain to faux bone, these faces are derived from one face carved by hand (mine - hand, that is, not face!), cured, a mold made, and the molded images further altered to reflect their roles in these "ancient" adornments.

HIROKI


HIROKI

Hiroki is sculpted from Cernit, hand tinted with oils, sitting on a "fan" back made from Kato clay, highlighted with red glitter, a veil of old paint brush "hair", a beautiful freshwater pearl, hammered steel wire, gunmetal chain, red glass lampwork beads, a brass coiled bail, hanging on an 18", 3 mm thick buna necklace, finished with a handmade brass hook and eye clasp.
QUETZELCULPA


QUETZELCULPA

Quetzelculpa evokes ancient Mayan excavations yielding finds of fossilized bone, ossified, dirt-encrusted, patinated to reflect centuries of burial. The face is layered on a beautiful sheet of mottled gold clay, overlaid with a gold encrusted "tiled" piece of clay. Again the piece is enhanced with simulated hair, wirework, crystals, lampwork bead, brass bead, gunmetal chain, hammered steel wire and brass clasp on 18" buna.

MIKADO


MIKADO

Mikado simulates sensuous, translucent, warm jade with accents of copper leaf in the topknot and kimono neckwrap. A creamy pearl, oriental coin and green Swarovski crystal provide movement. The head sits on a layer of antiqued fossilized bone impressed with oriental script next to a piece of coppery-gold-green "tiled" piece of clay. The necklace is gunmetal chain with two gunmetal hooks holding the hammered steel wire. These can be detached and a totally different neckwire put on if the wearer so chooses.


Thursday, January 19, 2012

Polymer Clay Tutorials, Tips, Tricks and Techniques

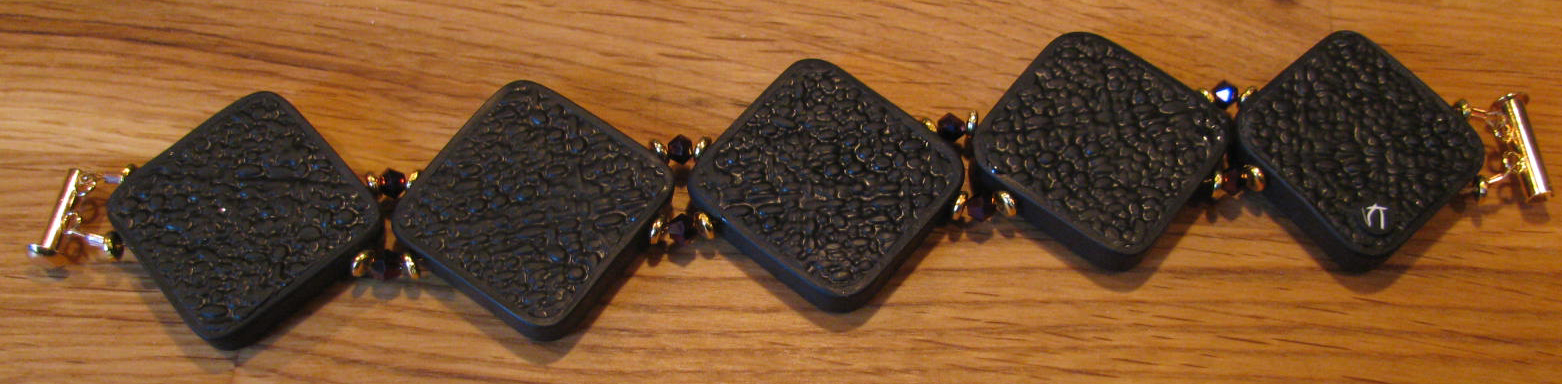
Here is the finished bracelet. Looks great with brass clasp and heishi beads. Also beautiful 4mm bicone crystals accent the piece. 


 The back has a nice finish. My signature cane is in place.


Here is a close-up and a picture of the bracelet on my arm. 


Saturday, January 14, 2012

The Beginning of "Polymer Clay My Way"

It's time to launch into the new value-added part of Claymagination - "Polymer Clay My Way". I thought of calling it "Your PC Guru" but that sounded a bit pretentious. In this segment I present solutions to problems I've encountered, techniques I've discovered along the way, techniques pioneered by other polymer clay artists that I've tweaked to make my own, or even ways in which I've found to highlight some wonderful techniques pioneered by other artists. I'll do my best to explain the reasons behind design decisions I've made and also present you with some design challenges that I find stimulating and fun.

This first episode pushes the technique taught by Lisa in last year's Claymagination 2011 retreat. One of the issues that I struggle with is settings that are not "worthy" of unique, hand-crafted art. We would all set our art into settings made from gold or platinum, if price were no issue, but in today's economy, art suffers badly, and the artist suffers along with it. We need to find a way to present our art so the work is not viewed as "cheap" yet the price we need to charge does not make our art inaccessible to most.

Silver plated settings look good, but only for a certain amount of time. Eventually the plating wears off, and our art gets set aside. Precious metal is wonderful, but pricey, and to help bring down the cost, artists (such as Lisa) are now making their own sterling silver settings. I really think that is the way to go since it dignifies and elevates the work to an art, but it does increase the price of the piece.

To keep the price down, if you have time available, consider using polymer settings. With attention to detail and finishing, your work becomes an even more hand-crafted work of art and it's permanence is guaranteed. It won't have to be sidelined because the plating wore off the setting!

Here is Lisa's technique set into polymer clay bezels.

As you can see, the lip of the bezel is raised slightly to accommodate the subsequent resin pour. One benefit of doing this is that there is no danger of the decorated surface "floating" when the resin is poured because it sticks to the polymer clay backing.


Now it's time to sand, with 400 only since I want the shine to be only on the resin surface.


You must make sure the polymer clay bezel is firmly attached to the square as the resin will find any little crack to seep out of it if can! You can see the upper corner on the back in the image above, the resin started to ooze out.


To see any of these pictures enlarged, just click on them.

I'll post a picture of the assembled bracelet when done. 
If you have any questions, post them to this blog post and I'll do my best to answer them. 

Christi Friesen's First Art Swap

Thought you might like to see the twisted, warped, mentally deranged work of art that Sandra sent in to the Art Swap! Yes, we all sleep with one eye open!

Appreciation

We should start each day by watching this 6 minute video. It readjusts our thinking in a wonderful way!

http://youtu.be/nj2ofrX7jAk