Friday, September 7, 2012

Creative Process: Birth of the Flamenco Collection - Mining a Vein

As mentioned before, the seeds of future work often lie in what you've just done. Having finished the Urban Urchin necklace, patterns and shapes keep my mind ablaze.

The beginning of the new Flamenco Collection, born from this little element in the Urban Urchin necklace.
This red ruffle is like the skirt of a beautiful flamenco dancer set against the black of her hair and her lace shawl - you can almost feel the movement. Problems have arisen that push forward, uninvited, demanding to be pushed further. The strength of polymer, properly supported - how thin and delicate can it go?


This prototype is the beginning of the new line. I'll be exploring this concept over the next while. You're welcome to eavesdrop on my thoughts and add some of your own.

Wednesday, September 5, 2012

Faux Amber - A Slightly New Approach

There are many wonderful tutorials out there for making amber, some free (paroledepate.canalblog and polymer clay express, just to mention a couple) and others for a fee but well worth the price (Tory Hughes), but I still felt the beads could look more, well, "amberish"! Here is what I came to that I am really happy with.


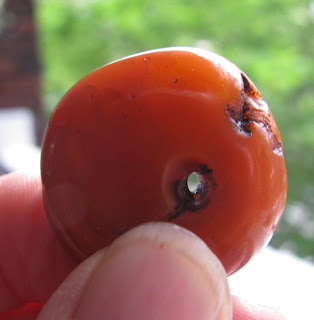
The weather today is overcast yet look how these beads above seem to glow, compared to amber created using other techniques below:

using small amounts of clay to colour the translucent clay

using alcohol inks to colour the translucent clay

How to do it? Here we go: Make up a pale warm yellow translucent, then some deeper caramel translucents using Premo translucent and alcohol inks (sunflower, butterscotch, caramel, etc.) Thanks to Jay I've corrected the colours as follows: The yellow is Pinata Sunbright Yellow. All the clay used is Premo translucent (not frost, but I'm sure that would work as well - I find it has a slight bluish cast when buffed, cooling down the warm amber a bit. The other colors that I work with are Pinata's Havana Brown, Calabaza Orange and Tangerine, and Adirondack's Terra Cotta, Caramel, Butterscotch and Latte. I mix the colors gradually, adding a bit of a brighter color if needed to brighten a mix, or a bit of the browner colors to dull down a too bright mix. The base yellow is the Sunbright Yellow knocked back a teeny bit with the havana brown. Check the comments on this post to see more.


 Roll a ball of the pale yellow (I also roll it around my desktop, picking up bits of metal, dirt, clay)


 Roll the darker amber clay out on the thinnest setting possible. Tear off a small piece.


Stretch this piece out as thinly as possible. It will start to tear - that's ok.


Stretch this piece around the pale ball, tearing and patching as you go, leaving some areas pale.


 Smooth the edges of the dark, thin sheet to blend them into the pale clay and into each other.


Roll in your hands to smooth out any lumps and bumps. Pierce any air pockets.


Shape the way you want and pierce a hole, giving thought to where the weight of the piece will pull the side down and out of view.


Dig out scratches, holes, push in texture, dimple, pierce.


I'm practicing hammering rivets in 18 gauge blackened steel wire. Not bad, but I'll insert these into the bead, so curve the back side so it will stay embedded in the bead when baked.


Sand 400, 600, 800, 1,000 and buff on Foredom or with dremel. Patina with oil paint (burnt umber mixed with black), dry, buff again.


My polymer clay muse, The Arctic Fox, aka "The Geologist", says these finally look like amber!!! He should know! It's tough having to come up to his standards!

Tuesday, September 4, 2012

Faux Naturelles - Rounding Out the Collection

I now have a couple of unique, arty lines to present to the buyer for the fall 2012 line, and it's time to round out the collection with some items made from what polymer clay simulates brilliantly - faux amber, bone and jade. They constitute the backbone of my Faux Naturelles line and always flesh out the trendier pieces at any given time. When it comes to these pieces, transiucence is essential so I work with Premo clay.


Tomorrow I'll discuss these faux techniques and what I've found to work best to my sensibilities.

Sunday, September 2, 2012

Step by Step Assembly of Urban Urchin Beads

This is a slightly different way of wiring beads and assembling them into a pair of earrings. It goes along with my views on "the mark of the artist", i.e. not being perfect.

These beads are hollow and there is no "top" to them, so they can slide around a bit on the wire. I have pattern around the entire surface of some of them, but others are fairly plain in back and I would like them to sit relatively deliberately positioned. A little ingenuity is required to wire them. Follow me:


I'm using 20 gauge blackened steel and brass wires.


Shape the blackened steel wire as per the upper image and the following close-ups, making sure to put the curve into the shorter end as shown,


 Loosely wrap the brass wire around the neck of the blackened steel as shown below:


Carefully tuck the end into the wrapping:


Insert the wire assembly into the bead and slowly push it in. The curved piece should be fairly tight as it creates tension and holds the bead in place. If it is too big a curve, snip a bit off the end until it goes in without distorting the bead yet holding it in place. The loosely woven brass wire will sit slightly into the hollow top.

Add the brass spacer bead and coil up the wire from the bottom, as shown. Consider how the beads will hang at the end. If from a necklace, I place the coil at right angles to the bail end so the coil faces to the side. If from earrings, with no jump ring between, I place the coil on the same plane as the bail. Make sure the image you want facing forward is in the right position when you are pushing the tension wire down into the bead.


If you are concerned about the blackened steel rusting at all down the road you can put some Renaissance wax on the exposed wire.

Saturday, September 1, 2012

Urban Urchins - Graffiti

Some of you have noticed that the ivory beads included in the Urban Urchins beads did not show up in the Urban Urchins necklace. That was a choice. I felt the ivory was so strong that it dominated the other beads. It's like painting or writing - sometimes there are more paintings or stories in your idea than just one! So I narrowed down the selection in the Urban Urchins necklace, thereby simplifying a very busy design somewhat, and leaving me with more beads to add to the collection, and here it is:

Urban Urchins - Graffiti


This design brings us back to designing jewelry with Modular Art Jewelry connections in mind, so this piece is detachable, and can be worn at any length, just by changing the Modular chain. Not only that, the entire look of the piece can be affected just by the choice of metal in the chain or material, using buna, leather, cotton, even ribbon.

I also love how kinetic these pieces are, moving in all directions freely. The art on these beads is original, my linework, carving these beads as I carve stamps to use in my paintings, having no preconceived ideas about what will appear, just letting the process flow - gestural - one stroke leading to another.