
Showing posts with label studio tips. Show all posts
Showing posts with label studio tips. Show all posts
Wednesday, April 10, 2013
Studio Tip #5: Slicing a Round Log
Saturday, January 26, 2013
Old Canes Never Die...
.... unless they are cured! But here's the reality of clay - it can start to cure at 90 degrees Fahrenheit (Kato starts to cure at 115 degrees F)! So those of you living in warm climates - beware!
I've seen a fair bit on blogs and pinterest lately about warming up old clay. The suggestions have been to put the clay in a ziplock bag and drop it into a bowl of hot water, or to put it on a heating pad. These ideas are only of use if you carefully monitor the temperatures involved, otherwise you may be shortening the shelf-life of your clay.
 Polymer clay doesn't really dry out as there is no water in there to evaporate. The chemicals that comprise polymer clay may separate a bit with time, but mixing these properly yields a product good as new.
The best way to store clay is in a cool, dark place. Light, even artificial light, affects clay because UV radiation breaks down polymer over time.
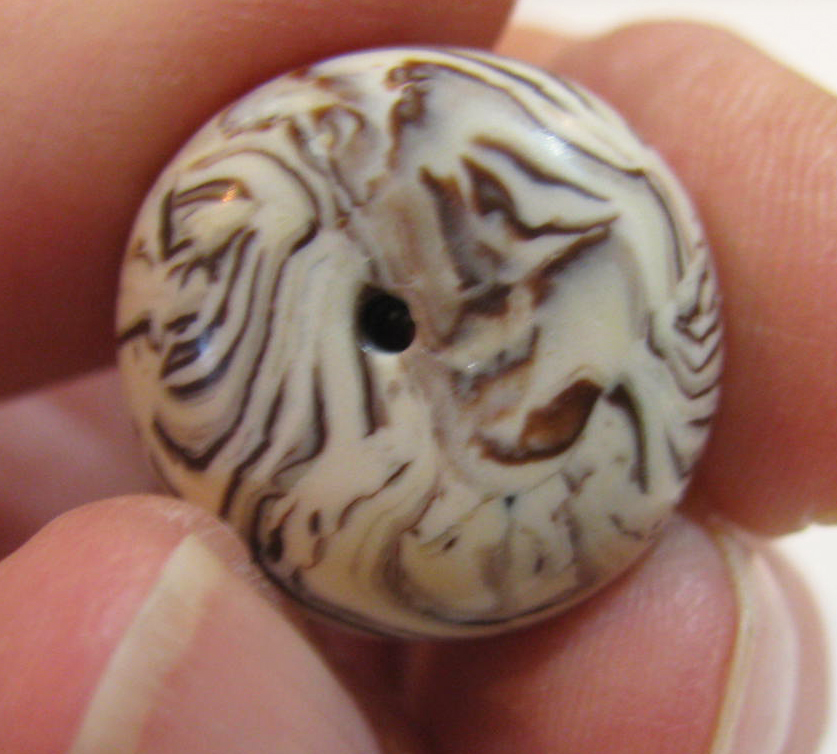
Warming clay up against your body is a good idea because, although your internal temperature is around 98.6 F, your surface skin temperature is usually around 10 degrees lower. This bead was just made with clay that is 18 years old!
 I've decided to use up all my old clay canes and other experiments. With the pendants I'm currently making,
like the Wind Whisperer, I want some rustic, ancient, woody/bone/resin type beads, and I saw this cane buried under a pile of old experiments. I had made my first mokume gane and didn't understand the role translucent played in highlighting metal leaf in this process so the result wasn't totally satisfactory since much of my silver leaf disappeared, hidden by the opaque bone layer. I then took all the scraps and stacked them and rolled a log, sliced it lengthwise into long, 1/4 rounds, flipped and reassembled them to experiment with the Natasha bead technique. the result was this cane.
 I only have 4 inches left, and, although I'm taking thin slices and covering scrap clay to make the beads, I'm a post-war baby and start to panic when I think I'm running out of something I find useful, so the following is to show you my process for reproducing this look (since I didn't keep lab books for my clay experiments when I first started out!)
I used Premo white, beige, ecru and burnt umber. I used silver leaf (aluminum, not sterling)
 I had mixed up an ivory using ecru, white and burnt umber but I've since changed to cad yellow, white and burnt umber so I'm using the new formula for ivory. I then mixed up some of this ivory with more burnt umber and beige to make the mid-brown, more translucent piece shown here.
The sheets were rolled out on the thickest setting and cut the same size and shape and the silver leaf adhered to the medium brown piece.
 These were stacked from dark to light. You'll notice that they are not perfect rectangles. I prefer to do mokume gane this way since I pinch and stretch and compress the stack till it takes the shape of a rectangle. In doing this I am distorting the layers slightly and I find this enhances the variation of the colour patterns when I slice thin sheets off.

Flatten this sandwich out till it fits through the thickest setting on the pasta machine. Roll through. Cut in three, stack, roll through again, cut in three, stack, press onto a tile or glass surface so it adheres well and then even up the edges a bit.


Spray the surface with water as a release agent and use various implements to distort the surface. When using straws or metal tubes to cut small circles, I spray water up into the tube to help keep the clay from sticking and getting pulled out of the stack. I use a rocking/circular motion as I gently press down and also as I slowly remove the texturizing tool. This helps keep the clay in the stack.
Use a paper towel to remove as much water as you can, flipping the tile over to drain any water out to the surface so you can absorb it. You don't want water trapped in the clay.

Press the stack together and roll your acrylic rod to compress the stack a bit to adhere the cut pieces so they don't fall completely apart when you slice.
For slicing I use the Thomas Scientific blade(shown in the post "Demo Part 1: The Ossifibulous Bracelet"), a new one. I clean the blade with a baby wipe between each slice. If you have difficulty controlling the blade, raise the stack up onto a scrap stack BEFORE you begin making the patterns in the stack (so you don't lose the tight grip the clay has on the surface). Take your time slicing. It is easier to feel the angle of the blade and make minor adjustments if you are going slowly. The movement that works best for me is a slicing movement slightly on the diagonal as I am drawing the blade towards me. That way you are cutting, rather than pushing the clay.
 Check out both sides of the slice to see which one you like the best. I place my slices on wax paper so I can lift the paper afterwards, look at the patterns from underneath and decide which slices I want to flip over.

This tiny stack and slow slicing yielded 8 full and 2 3/4size usable slices - that's great!
 This was a nice side benefit of reconstructing the old scrap cane, but now it's time to stack the scrap left over, including any solid pieces of ivory. I stack it all, stretch, adding thinned out ivory to separate the darker layers, then roll this stack into a log. Cut the log lengthwise, then cut each long half in half lengthwise again so you have four longish quarter rounds. Flip these over and assemble as per a Natasha bead (if you don't know or can't find instructions for the Natasha technique, leave a comment and I'll show it on the blog)


The original bead made 18 years ago from the original mokume gane scrap (I like to keep one bead for reference and future development)

The new bead.
 Polymer clay doesn't really dry out as there is no water in there to evaporate. The chemicals that comprise polymer clay may separate a bit with time, but mixing these properly yields a product good as new.
The best way to store clay is in a cool, dark place. Light, even artificial light, affects clay because UV radiation breaks down polymer over time.
Warming clay up against your body is a good idea because, although your internal temperature is around 98.6 F, your surface skin temperature is usually around 10 degrees lower. This bead was just made with clay that is 18 years old!
 I've decided to use up all my old clay canes and other experiments. With the pendants I'm currently making,
like the Wind Whisperer, I want some rustic, ancient, woody/bone/resin type beads, and I saw this cane buried under a pile of old experiments. I had made my first mokume gane and didn't understand the role translucent played in highlighting metal leaf in this process so the result wasn't totally satisfactory since much of my silver leaf disappeared, hidden by the opaque bone layer. I then took all the scraps and stacked them and rolled a log, sliced it lengthwise into long, 1/4 rounds, flipped and reassembled them to experiment with the Natasha bead technique. the result was this cane.

I used Premo white, beige, ecru and burnt umber. I used silver leaf (aluminum, not sterling)

The sheets were rolled out on the thickest setting and cut the same size and shape and the silver leaf adhered to the medium brown piece.


Flatten this sandwich out till it fits through the thickest setting on the pasta machine. Roll through. Cut in three, stack, roll through again, cut in three, stack, press onto a tile or glass surface so it adheres well and then even up the edges a bit.


Spray the surface with water as a release agent and use various implements to distort the surface. When using straws or metal tubes to cut small circles, I spray water up into the tube to help keep the clay from sticking and getting pulled out of the stack. I use a rocking/circular motion as I gently press down and also as I slowly remove the texturizing tool. This helps keep the clay in the stack.
Use a paper towel to remove as much water as you can, flipping the tile over to drain any water out to the surface so you can absorb it. You don't want water trapped in the clay.

Press the stack together and roll your acrylic rod to compress the stack a bit to adhere the cut pieces so they don't fall completely apart when you slice.
For slicing I use the Thomas Scientific blade(shown in the post "Demo Part 1: The Ossifibulous Bracelet"), a new one. I clean the blade with a baby wipe between each slice. If you have difficulty controlling the blade, raise the stack up onto a scrap stack BEFORE you begin making the patterns in the stack (so you don't lose the tight grip the clay has on the surface). Take your time slicing. It is easier to feel the angle of the blade and make minor adjustments if you are going slowly. The movement that works best for me is a slicing movement slightly on the diagonal as I am drawing the blade towards me. That way you are cutting, rather than pushing the clay.


This tiny stack and slow slicing yielded 8 full and 2 3/4size usable slices - that's great!
 This was a nice side benefit of reconstructing the old scrap cane, but now it's time to stack the scrap left over, including any solid pieces of ivory. I stack it all, stretch, adding thinned out ivory to separate the darker layers, then roll this stack into a log. Cut the log lengthwise, then cut each long half in half lengthwise again so you have four longish quarter rounds. Flip these over and assemble as per a Natasha bead (if you don't know or can't find instructions for the Natasha technique, leave a comment and I'll show it on the blog)


The original bead made 18 years ago from the original mokume gane scrap (I like to keep one bead for reference and future development)
The new bead.
Wednesday, December 5, 2012
Studio Tip #4 - Working With Resin
 |
| The Sludge Jar |
(click on images for larger photos)
No, I have not branched out into alchemy, although I do find some of the ancient premises fascinating. The creative scientist in me is always driven to defy accepted limitations. This, my friends, is my "Indiana Jones" moment, my crystal skull, if you will. Working with mixed media, resin is a regular tool. One problem with resin is that it sticks - sometimes where you don't want it to. We know it does not stick to polyethylene (white kitchen garbage bags) which is why my studio worktable is covered with garbage bags. You can drop left-over resin onto the plastic and, two days later, peel them right off to use elsewhere. But I digress.
 When a resinned surface needs to be sanded down to remove bubbles or schmutz, it's almost impossible to sand and buff the surface to achieve that initial, brilliant shine. It's much easier to brush on a new coat of resin which seals all the scratches and marks and gives a brilliant shine again. That's what I had to do with the pendant below, and you can see it looks like new.
In order to brush on the liquid resin, you need to use a brush, and every professional I've spoken to says the brush is toast afterwards - toss it in the garbage. I love to brush resin onto stamped tissue paper, but the idea of using a sponge (soaks up a ton of resin and has to be thrown out afterwards) or a brush that would have to be sacrificed is not acceptable. (I'll talk about the pros of using resin to coat tissue paper over using liquid clay another time). So, time to experiment. I've used several products in my art-life that I have talked about in my workshops, getting a kiss on the cheek from one student's husband because he had been able to recondition all his old acrylic paint-encrusted brushes to supple new softness - but I digress again. I hauled out "The Sludge Jar", the jar I use to clean my paint brushes after antiquing clay with oil paint. It contains:


Some pics of resin work in progress for the weekend show.


Saturday, September 29, 2012
Silk Purse Bracelet - Using Scrap Clay

Silk Purse Bracelet
I'm working on the process of creating interesting spiral lentil beads from scrap clay. The fact that they are made from scrap clay makes them difficult to control and therefore difficult to reproduce. I've been working on a technique - actually, I've noticed that I have a way of working with scrap clay that gives me specific results, results I really enjoy. Ergo, I've been paying better attention to what it is that I do when I work with scrap clay. I have a real problem using up scrap clay as, well, as scrap! When I start mixing up the scrap I go through stages where it surprises me with the beautiful, serendipidous juxtaposition of colours and patterns that appear. I have been known to tuck the sheet away when it gets to a particularly gorgeous state or to bake it up as colour studies for future work both in clay and in painting.


Baked colour inspiration, both sides.
Because of this, contrary to many clay artists, I have a serious lack of scrap clay. I'm at the stage where I really hesitate to touch it for fear of using up bits that would contribute to the next batch of unexpected beauty!!! Yes, I know, crazy, right?
The silk purse necklace, previously posted, and now this silk purse bracelet were both made from two different (but related) batches of scrap clay. So I'm now starting to understand how to control this wild process and even how to make sure I get certain effects that I specifically want.
Study the Silk Purse Bracelet beads below and tomorrow we'll talk about one of the most important elements of design for impact.


Study the Silk Purse Bracelet beads below and tomorrow we'll talk about one of the most important elements of design for impact.


Thursday, September 20, 2012
Studio Tip #3 - Piercing Consistent Bead Holes
Exploring technique, design, form and connections is stimulating. Finishing is frequently tedious. I compare it to making a dress. You can have the most beautiful fabric and intriguing pattern, but if the seams are crooked, the edges unravelling, the zipper lopsided and the hem wonky, no one will ever really notice the beauty of the material and the design of the gown. Finishing is the key to professional work, and anything we can do to make finishing easier is worth exploring. A few things that work for me in piercing holes consistently (whether centered or not) are as follows:

Some form of graph paper (in this case, a pad of old ledger sheets) can help line up the holes on irregularly shaped beads. Centre the bead on a line, choose the line for the hole(s), slightly push a thin bead-baking pin into the bead on one side just far enough to make a guide hole, then do the same on the other side. Pick the bead up and carefully drill the pin through the bead, stopping just as it appears on the other side. If you've missed the guide hole on the other side, just remove the pin and push it in through that guide hole on the other side, and gently close the errant hole.


When working on a lot of beads with double holes, such as square bracelet beads (this also works on curved beads) I took two T-pins (macrame pins for those of you who are aging hippies, like me), embedded them in scrap clay which I wrapped in scrap canes, set at the right distance from each other, and cured.


This tool will quickly make consistent holes in a lot of beads, especially beads with channels inside that are wrapped with a strip of clay that would hide the channel. If the channel is set at a width that corresponds with the distance between the two T-pins, it's pretty quick work.


I cut a piece of eraser to size and push the tool into it so I can use it to protect the tool (and my hands) when in the drawer.
Monday, September 10, 2012
Studio Tip #2 - Baking on Curved Form
When I want to get a slight curve, as in the pieces in the Pegasus Necklace, I bake on a round glass form (an old IKEA lamp shade). So now I'm working on earrings to go with the jewelry lines I'll be presenting. This pair go with the Pegasus necklace and I want to make a version with a clip-on since I have had several requests from ladies who do not have pierced ears. I want to embed the clip-on so it is invisible, rather than just gluing it to the back. Here's what I do:

The surface veneers are made and baked on the top of the glass form.

Two sheets are cut to the shape of the earring veneer: a textured sheet that will become the back, through which I have cut a small slit so the clip-on back can slip through, and a plain sheet that will be sandwiched in the middle, the same thickness as the metal back of the clip-on, with a cutout window that is the shape of the back of the clip-on so that it sits embedded smoothly. Slip the clip-on back through the textured sheet, rotate into proper orientation and set into the cutout on the second sheet. Gently press the two sheets together.

These backs are baked on the INSIDE of the same glass form. The difference in the diameter of the form shape is only 2 times the thickness of the glass, which is negligible, and the veneer and the two-layer back piece fit very well together:


Scratch the surfaces that meet together, on the inside, with a needle tool, apply liquid clay (thin layer), edge with a thin strip of black to give a nice finish, apply your signature, rebake, and you're done, with the clips nicely embedded in the back.

Tomorrow, two finished pairs of earrings to go with their respective necklaces.

The surface veneers are made and baked on the top of the glass form.

Two sheets are cut to the shape of the earring veneer: a textured sheet that will become the back, through which I have cut a small slit so the clip-on back can slip through, and a plain sheet that will be sandwiched in the middle, the same thickness as the metal back of the clip-on, with a cutout window that is the shape of the back of the clip-on so that it sits embedded smoothly. Slip the clip-on back through the textured sheet, rotate into proper orientation and set into the cutout on the second sheet. Gently press the two sheets together.

These backs are baked on the INSIDE of the same glass form. The difference in the diameter of the form shape is only 2 times the thickness of the glass, which is negligible, and the veneer and the two-layer back piece fit very well together:


Scratch the surfaces that meet together, on the inside, with a needle tool, apply liquid clay (thin layer), edge with a thin strip of black to give a nice finish, apply your signature, rebake, and you're done, with the clips nicely embedded in the back.

Wednesday, August 22, 2012
Studio Tips - Silkscreening
When silkscreening clay, even though the paint dries, it is relatively fragile on the surface of the unbaked clay. If you want to shape the piece into a curve, this trick makes the job easier. Make sure the paint is dry. Then burnish a piece of Clear Deli Wrap or even Saran Wrap onto the surface of the silkscreened piece.


Lift the clay with the plastic burnished onto the surface, position on the curved baking form, and slowly press the clay onto the form. When shaped to your satisfaction, slowly pull back the plastic. Bake.

Subscribe to:
Posts (Atom)